【Azure】AzureRMS APIを使用した暗号アプリを作成する
こっからの続き。
AzureRMS環境構築後、APIを使用してRMSのアプリを作成するメモです。
適当に暗号化するアプリを作るよ!!
ちなみに、Azure RMSとか新し目の技術を使っておきながら、
作るアプリケーションはC++でMFCです。
\(^o^)/<化石かよ!!! でも好き!!!>\(^o^)/
目次兼手順は以下
--------
1.AzureADにアプリケーションを登録
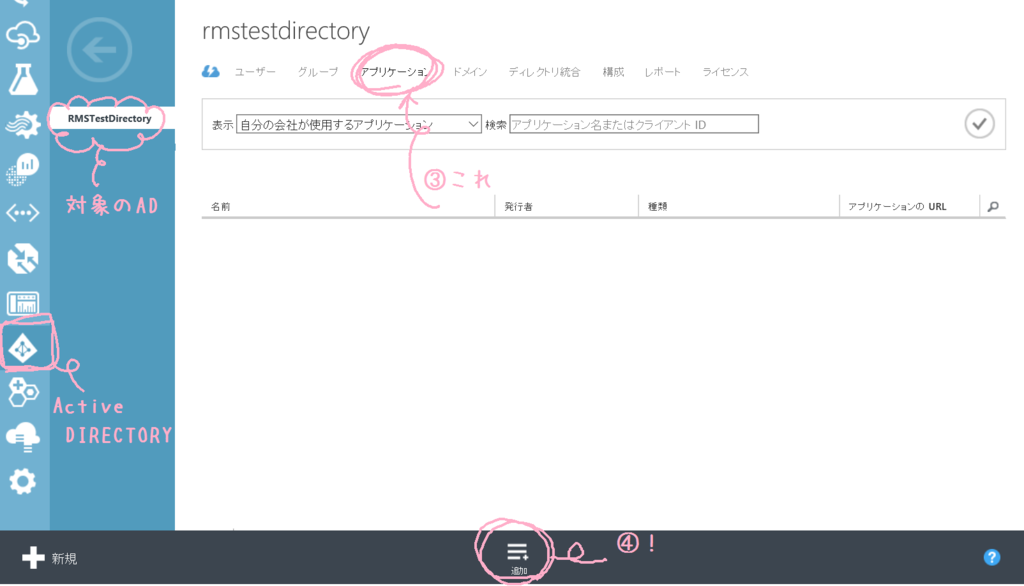
①左メニューから[ACTIVE DIRECTORY]を選択
②対象のActiveDirectoryを選択
③上部メニューから[アプリケーション]を選択
④[+追加]を選択

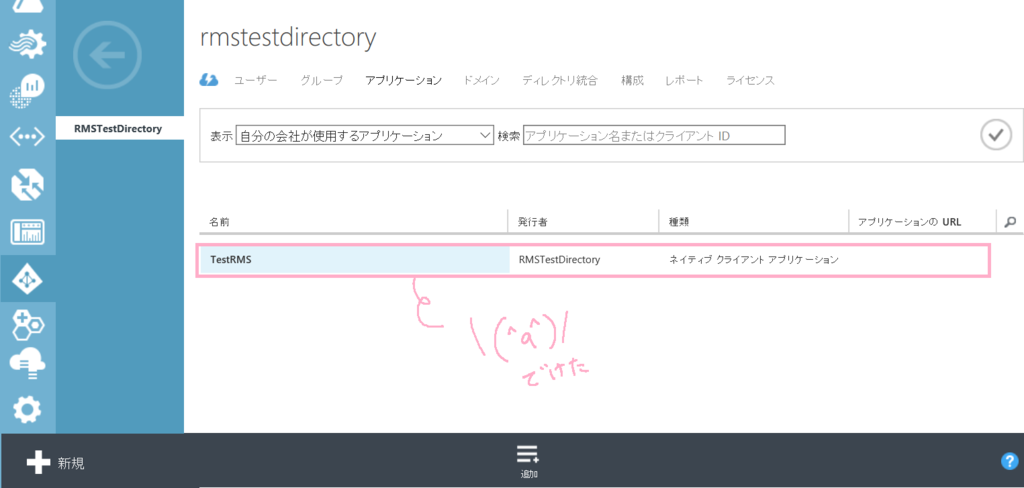
⑤出てきたダイアログで適当にアプリ情報を登録
詳細はここら辺を参照↓
ADAL 認証用のアプリの構成 | Microsoft Docs
私は「TestRMS」という名前のネイティブクライアントアプリとして登録。

2.暗号化に必要な情報を取得
基本は以下のページの手順に則り、実施↓。
クラウド ベース RMS でサービス アプリケーション使用を有効化する方法 | Microsoft Docs
①Microsoft Online サインイン アシスタントをインストール
https://www.microsoft.com/ja-jp/download/details.aspx?id=41950
②Azure AD PowerShell モジュールをインストール
https://www.microsoft.com/ja-jp/download/details.aspx?id=41950
③Azure RMS PowerShell モジュールをインストール
https://docs.microsoft.com/ja-jp/information-protection/deploy-use/install-powershell
④AzureADのPowerShellを起動して、以下を実行
Import-Module MSOnline
Connect-MsolService (管理者の資格情報を入力)
New-MsolServicePrincipal (アプリ名を聞かれるので、1で登録した名前を入力)
出てきた情報をメモ。
⑤AzureADのPowerShellで引き続き、以下を実行
Import-Module aadrm
Connect-AadrmService (管理者の資格情報を入力)
Get-AadrmConfiguration
出てきた情報をメモ。
④⑤を通すとこんな感じ
PS C:WINDOWSsystem32> Import-Module MSOnline
PS C:WINDOWSsystem32> Connect-MsolService
PS C:WINDOWSsystem32> New-MsolServicePrincipal
コマンド パイプライン位置 1 のコマンドレット New-MsolServicePrincipal
次のパラメーターに値を指定してください:
DisplayName: TestRMS
The following symmetric key was created as one was not supplied X5Vj+N9bk38bwwWxGpNeHi6r32oiKxduEyrTAqGidQI=
DisplayName : TestRMS
ServicePrincipalNames : {a7571801-27e2-4863-9c5f-6485c7c20505}
ObjectId : a992522e-2109-417c-a7c0-90d2dbb5beb8
AppPrincipalId : a7371501-27c2-4863-9c3f-6485c7d20503
TrustedForDelegation : False
AccountEnabled : True
Addresses : {}
KeyType : Symmetric
KeyId : aaf125f4-c25f-4823-bcf2-238de9ca378b
StartDate : 2017/03/11 14:46:53
EndDate : 2018/03/11 13:46:53
Usage : Verify
PS C:WINDOWSsystem32> Import-Module aadrm
PS C:WINDOWSsystem32> Connect-AadrmService
A connection to the Microsoft Azure AD Rights Management (AADRM) service was opened.
PS C:WINDOWSsystem32> Get-AadrmConfiguration
BPOSId : 6e0da1ab-d715-48c9-91cc-1ae9952039fe
RightsManagementServiceId : f5c1aaa4-6d0c-42cc-a24d-6e8006b8a323
LicensingIntranetDistributionPointUrl : https://f5c1abc4-600c-42cc-a24d-6e8006b3a323.rms.ap.aadrm.com/_wmcs/licensing
LicensingExtranetDistributionPointUrl : https://f5c1abc4-600c-42cc-a24d-6e8006b3a323.rms.ap.aadrm.com/_wmcs/licensing
CertificationIntranetDistributionPointUrl : https://f5c1abc4-600c-42cc-a24d-6e8006b3a323.rms.ap.aadrm.com/_wmcs/certification
CertificationExtranetDistributionPointUrl : https://f5c1abc4-600c-42cc-a24d-6e8006b3a323.rms.ap.aadrm.com/_wmcs/certification
AdminConnectionUrl : https://admin.ap.aadrm.com/admin/admin.svc/Tenants/f5c1abc4-600c-42cc-a24d-6e8006b3a32c
AdminV2ConnectionUrl : https://admin.ap.aadrm.com/adminV2/c-42cc-a24d-6e8006b3a32c
OnPremiseDomainName :
Keys : {814d5d6d-3fd7-4b61-9b23-635b36782cff}
CurrentLicensorCertificateGuid : 814d5d6d-3fd8-4b61-9b23-635b49c82cff Templates : {8209c59f-21f5-42ab-b8f1-bf825c4cf896, 473a0ba4-36b7-47a6-9d0c-fe3933abd0c4}
FunctionalState : Enabled
SuperUsersEnabled : Disabled
SuperUsers : {}
AdminRoleMembers : {}
KeyRolloverCount : 0
ProvisioningDate : 2017/03/11 14:19:46
IPCv3ServiceFunctionalState : Enabled
DevicePlatformState : {Windows -> True, WindowsStore -> True, WindowsPhone -> True, Mac -> True...}
FciEnabledForConnectorAuthorization : True
DocumentTrackingFeatureState : Enabled
3.開発環境にSDKのインストール
①RMS SDK(2.1)のダウンロード
https://www.microsoft.com/en-us/download/confirmation.aspx?id=38397
からAzureRMSSDKをインストール
4.プロジェクトの作成と、リンカーやら設定
①VSでプロジェクト作成
②プロジェクトにSDKのリンカとか設定
プロジェクトのプロパティを開いて設定追加。ここに書いてある通りに↓
(参考:https://docs.microsoft.com/ja-jp/information-protection/develop/how-to-configure-a-visual-studio-project-to-use-the-ad-rms-sdk-2-0)
☆[構成プロパティ] →[VC++ ディレクトリ] → [インクルード ディレクトリ]に“$(MSIPCSDKDIR)inc”を追加
☆[構成プロパティ] →[VC++ ディレクトリ] →[ライブラリ ディレクトリ] に“$(MSIPCSDKDIR)lib”を追加。
(x32の場合は“$(MSIPCSDKDIR)lib”)を追加。
☆[リンカー] →[入力] →[追加の依存ファイル]に“Msipc.lib;Msipc_s.lib”を追加。
☆[リンカー] →[入力] → [DLL の遅延読み込み]に“Msipc.dll” を追加。
5.プログラムかきかき
後は適当に用意されたAPIを使ってプログラムするだけ!
基本的に必要になる情報は手順2の最後に書いた実行結果の緑文字の部分。
作ったアプリの一部だけサンプルとして↓
初期化して、テンプレート取ってきて、ファイル暗号にかけてるだけ!
6.できたかな!
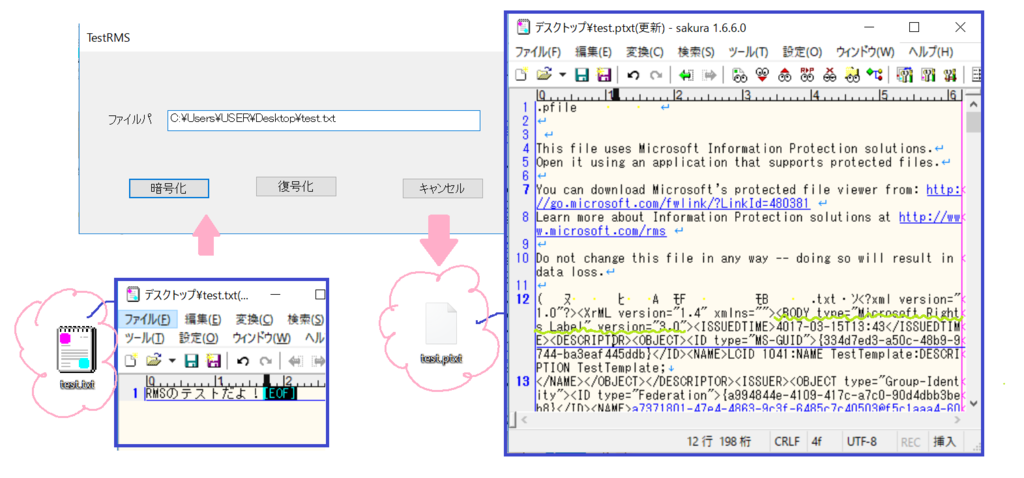
アプリを起動して、ファイル指定!暗号化!!!

暗号化されて、pファイルになったよ!!!
中身も暗号化されてる!!
ちなみに、Office系ファイルは暗号化しても拡張子が変わらないので、見た目だけだとよく分からないよ\(^o^)/
中見て<BODY type="Microsoft Rights Label" version="3.0">ってタグが入ってたらRMSで暗号化されたファイルみたいです。
おしまい!